
|
|
|
E-Type
Jaguar Conversion
|
|
|
Like a lot of people I get frustrated by some of my favourite cars not being available as slot racers or in some cases only available at highly collectable prices. Although some 1/32 scale Airfix kits have been in the shops, and recently an increasing number of re-releases have become available, it is only since the excellent range of Ninco cars has provided a good source of chassis and wheels that it has become easy to build some of the classic cars that appeal to me. Recently I have been able to convert Airfix VW Beetles, Austin Healey-Sprites and Ferrari250LM’s etc. Other good sources of donor bodyshells come from Revell’s "easy-kit" range with their excellent Shelby Cobra, AMT’s range of Nascars and Gunze Sangyo’s range of classic American 1950’s gas guzzlers complete with plenty of chrome and tail-fins!In moments of madness I even motorise Tamiya 1/24 and 1/20 kits, did you know fo r example that a Ninco Ferrari 166 chassis with McLaren F1 GTR wheels drops into a Tamiya 1/24 Mini-Cooper kit body with minimal modification. Taking this theme a bit further you can motorise the Tamiya Lotus 25 and the current Formula One’s complete with driver figures and drive them on the middle two lanes of a 4 lane circuit, the kit wheels and tyres don’t have high levels of grip but in the Lotus 25’s case this produces a very realistic level of performance. Carrying
out these conversions is not an exact science and there is quite a degree
of improvisation throughout the build process as little problems occur
which you have to overcome but after you’ve carried out a few you develop
a style that makes you approach each new project in a similar way and
be more able to anticipate problems and plan for them. 1}
|
|||
|
My method for a typical conversion is as follows. First choose your subject, the more passionate you feel about the real car the better as this will provide the motivation to see you through the awkward moments in the project when all you want to do is give up, swear and throw the model in the bin!
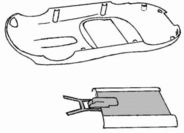
Cut away the plastic (shaded grey) from the front and rear body sections leaving just the outer body panels but don’t glue them to the upper body yet. The cut out areas on the front and rear underbody pieces to enable the chassis and guide to fit into this very slim and shallow body. My measurements were a rectangle of 29mm x 8mm at the rear and an arc at the front with a maximum depth of 7mm
Once hardened, fill the seams of the body panels – I use Milliput putty but it’s a personal choice and we all have our favourite materials – Leave overnight before sanding smooth with fine Wet & Dry prior to painting.
|
|||
|
|
|||
|
Cut out a thin sheet of plastruct plastic to blank in the interior, glue a driver figure of your choice to this, I used the Ninco figure from the Porsche, having reduced it to head and shoulders to fit. Spray the body, fit the small details and apply the decals of your choice. After 24 hours I gave it a couple of coats of clear lacquer to protect the finish.
The car handles really well and is very fast on the main straight at the club, I find it much more fun to drive than the SCX fixed head version. To preserve the condition of my models I display them in Ninco Motorsport boxes having removed the original labels and applying the cars title with Letraset rub down lettering to the base. The E-Type is a typically narrow 1960’s motor car and to fit the axles to this model you need to reduce the track to 31mm, this involves cutting the axles and also filing a little material off the inside of the wheel hubs so that they clear the bodywork and don’t rub on the chassis.
|
|||
|
To
fit the body to the chassis I find Plastruct plastic tubing is ideal,
offer the body to the chassis and gauge the approximate length of the
mounting posts. Cut them to size allowing a couple of millimetres extra
to be safe, attach these posts to the chassis with their screws and
place the body in place. Look at the way the wheels sit in the wheel
arches adjust the ride height by filing off tiny amounts of the posts
until you are satisfied with the result. This can take several attempts
to get it just right, but it’s worth taking your time, as the way a
car sits on the road is a major factor in getting a model to look "right".
David
Lawson
|
|||
|
|
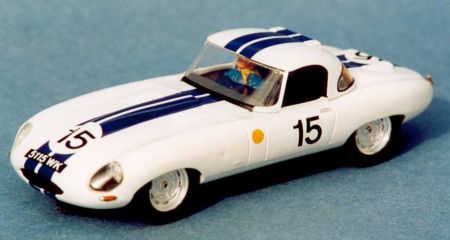 I’ve
always loved the lightweight E-Type Jaguar from the mid 1960’s GT racing
and decided to have a go at converting the Airfix kit to represent the
car entered for Le Mans in 1963 by Briggs Cunningham. My choice was
governed by the striking colour scheme. This car finished ninth overall,
completing 2372.45 miles at an average speed of 98.85mph winning the
4-litre class in the process.
I’ve
always loved the lightweight E-Type Jaguar from the mid 1960’s GT racing
and decided to have a go at converting the Airfix kit to represent the
car entered for Le Mans in 1963 by Briggs Cunningham. My choice was
governed by the striking colour scheme. This car finished ninth overall,
completing 2372.45 miles at an average speed of 98.85mph winning the
4-litre class in the process.
 Starting
on the body, you first have to prepare the upper body, bottom sections
of the nose and tail and the side sections of the monocoque/sills for
gluing and filling to form a one-piece body shell suitable for a slot
racer.
Starting
on the body, you first have to prepare the upper body, bottom sections
of the nose and tail and the side sections of the monocoque/sills for
gluing and filling to form a one-piece body shell suitable for a slot
racer.
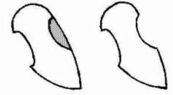
 Cut
the centre section (shaded grey) out of the lower body/chassis and glue
the remaining sills to the upperbody with a strengthening piece of scrap
plastic along the inside of the join.
Dry
fit these pieces and when you are satisfied
that the chassis is positioned correctly within the body you can then
glue them in place.
Cut
the centre section (shaded grey) out of the lower body/chassis and glue
the remaining sills to the upperbody with a strengthening piece of scrap
plastic along the inside of the join.
Dry
fit these pieces and when you are satisfied
that the chassis is positioned correctly within the body you can then
glue them in place.
 With
this conversion I sanded the textured cloth effect smooth on the roof
to simulate a hard top prior to painting also adding a racing fuel filler
cap in the top of the boot and some ducting to the roof and boot as
well but I won’t detail this as it is specific to this car and you can
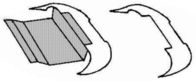
obviously build most kit conversions "from the box". Cut
the chassis at a point between the front body mounting post and the
hole for the motor mount locating screw and add a 9mm fillet of plastic
sheet (Shown shaded grey in the diagram) to extend the wheelbase to
76.5mm.
With
this conversion I sanded the textured cloth effect smooth on the roof
to simulate a hard top prior to painting also adding a racing fuel filler
cap in the top of the boot and some ducting to the roof and boot as
well but I won’t detail this as it is specific to this car and you can
obviously build most kit conversions "from the box". Cut
the chassis at a point between the front body mounting post and the
hole for the motor mount locating screw and add a 9mm fillet of plastic
sheet (Shown shaded grey in the diagram) to extend the wheelbase to
76.5mm.
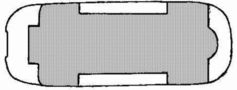
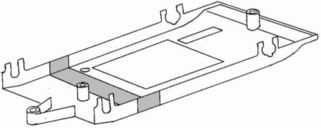 Also
remove all the parts of the chassis that fit the shape of the Porsche
so you are left with just the central section, which measures 101mm
x 28mm and looks like the diagram below.
Also
remove all the parts of the chassis that fit the shape of the Porsche
so you are left with just the central section, which measures 101mm
x 28mm and looks like the diagram below. 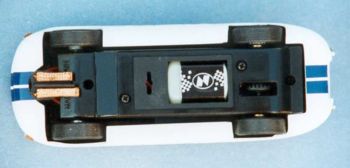 Put
a drop of 5minute epoxy glue on each of the posts and place the body
onto the chassis,position it so that all the wheels fit correctly in
the wheel arches and the body is sitting level to the ground. Now leave
the model to sit for an hour or so before removing the screws and you
are left with the body complete with the mounting posts in position.
Put a further generous amount of epoxy around both the posts to form
a strengthening "shoulder".
Put
a drop of 5minute epoxy glue on each of the posts and place the body
onto the chassis,position it so that all the wheels fit correctly in
the wheel arches and the body is sitting level to the ground. Now leave
the model to sit for an hour or so before removing the screws and you
are left with the body complete with the mounting posts in position.
Put a further generous amount of epoxy around both the posts to form
a strengthening "shoulder".