|
|
|
Ferrari
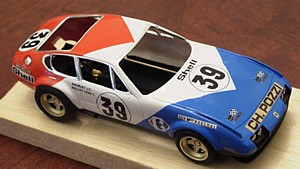
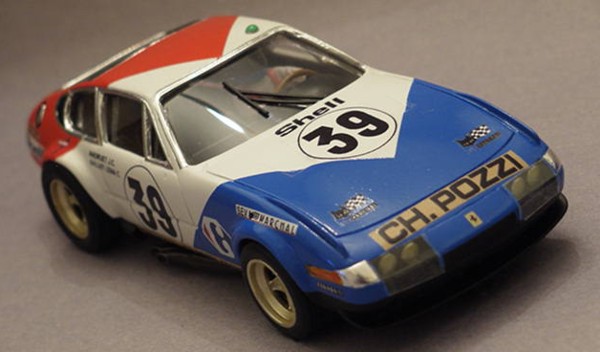
Daytona by David Lawson.
|
|
|
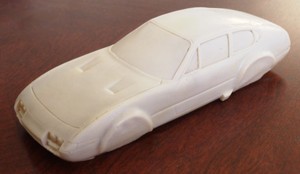
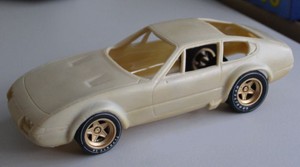
Conversion Details This is a Mike Sells modified resin bodyshell. Mike started with a Nitto kit of the road car, and added the flared wheel arches to convert it into the GT racer.
|
Resin/Fly Ferrari 365 GTB4 Le Mans 24 Hour June 10th/11th 1972 C. Ballot-Lena / J.C.Andruet Ferrari 365 GTB4 - 4.4-litre V12 Entrant: Charles Pozzi Automobiles, France 5th Overall, 305 laps - 4,162.660km Winner of Group 4 - Special Grand Touring |
||
|
I cut the windows and arches out with a mini drill and sanded to shape as usual with a resin body. I sprayed the car with Halfords "Appliance White" spray as I always do. A bit of a set back the paint started flaking off due to my not preparing the shell properly in the first place, so I stripped it again by picking the paint off with cocktail sticks, sanding it, and giving it a thorough soak in caustic soda before a final rub down and wash - A lesson in not rushing things was learnt here!
|
 |
||
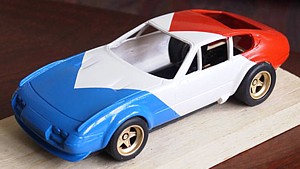 |
I tried again, masked the colour separation lines with Tamiya masking tape and sprayed the front area in Halfords Ford Electric/Monza Blue and the rear area with Halfords Volkswagen Mars Red. | ||
| I used a Fly Dodge Viper chassis for this conversion as the wheelbase is spot on. All I had to do was fit Fly Ferrari 512 wheels and tyres. Parts of the chassis, outside of the strengthening rails, were removed with plastic cutters and sanded smooth. The rear wheels and tyres were reduced in width by fitting the axle in a drill and cutting with a fine saw, to reduce the track and to fit within the wheelarches. | 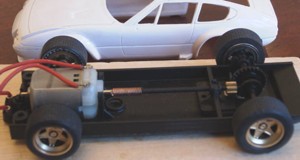 |
||
|
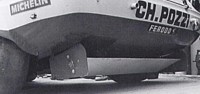 |
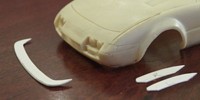
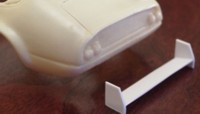
The front and rear spoilers were made by referring to photographs, drawing paper templates, and transferring to plastic sheet. To cut the slots in the body, I draw the line of the spoiler on the body, and, either drill a series of holes along the line and then open them up with a blade, or, use a panel scriber, I run this repeatedly along the line until it is of the correct depth. I also marked and cut out the front valance body openings used on the race car for extra engine and brake cooling. The spoilers were fitted with epoxy resin adhesive |
||
 |
I applied the excellent Patto decal set. On the red and blue background, I applied two decals one on top of the other to achieve a solid colour. After leaving them to dry completely for 24 hours, I sprayed the whole body with Halfords Clear Lacquer.
|
||
|
*SPECIAL NOTE* : When doing this, make the first couple of coats extremely light and leave to harden for 20 minutes before the next coat otherwise the solvent in the lacquer will attack the decals. Once you have done a few light coats you can then put a normal heavier coat on to achieve the finish you want. Bare Metal Foil was applied to all the window surrounds and the fuel filler cap. |
|||
|
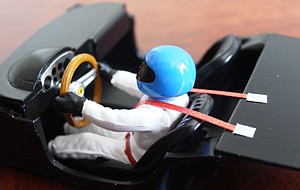
I searched my spares boxes and found that the Revell easy-kit Cobra interior was a fairly close fit to the Daytona and I made up a rear platform and dashboard from plastic sheet. These aren't that detailed, as once painted black you won't see that much of it. The Fly Chevron driver had to have his feet removed, his hands cut off, rotated 90 degrees and refitted to hold the steering wheel. I added an instrument cluster out of foil and Letraset black dots, painted the driver's helmet and added red seat belts out of material which I attached to the rear shelf with foil squares.
|
|
||
|
After adding the body mount posts, a windscreen wiper, the exhausts, a roof light, headlight covers, and screens made from plastic sheet, the car was finished. Although, I keep thinking about adding a roll cage, body fasteners and straps; for the time being, having spent four weeks living and dreaming Daytonas! I need to work on something else. |
|||
 |
|||
|
|